Authenticating ASP.NET 5 to AD FS OAuth Part 2: Claims
Last we looked at using the ASP.NET Identity Framework to authenticate to AD FS with OAuth2. This did simple authentication, but no claim information about the identity was known – we had a single claim for the token, and that’s all. Next, we are going to add some information about the user as a claim on the identity.
The first step, is to have AD FS send the claims that you want. This is done by configuring the Relying Party’s Claim Rules.
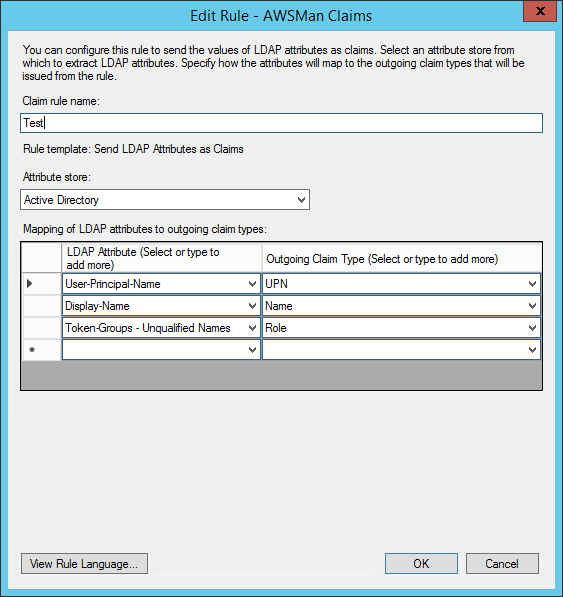
I’m sending three claims here – the UPN, Display Name, and “Token-Groups”. The UPN is the user principle name in Active Directory, like kjones@mycompany.org. This is used to identify the user in a unique way, like a username. The display name is used for a friendly, “Hello, Kevin” on the header of the application. The Token-Groups in this case are simply the active directory groups the user belongs to. There are three different choices. Unqualified means it’s just the name of the group, like “MyGroup”. Next is short qualified, like “mydomain\MyGroup”, and lastly there is fully qualified, like “mydomain.local\MyGroup”. I’ve opted for the unqualified, which you use is up to you, if you use them at all. You many not want to use unqualified if you have more than one domain in the forrest with a trust relationship. If there are two groups with the same name in different domains, you wouldn’t be able to tell them apart.
The outgoing claim type is the type of claim that the receiver, in this case our application, will see.
We need to get our application to handle this correctly now, which isn’t too
hard. Ultimately, what AD FS does is encode all of this into a JWT. We need to
handle the token as a JWT token, extract the claims, and create an identity
with this information. To do so, we need to handle the OnGetUserInformationAsync
notification, where we are given the raw token from AD FS.
options.Notifications = new OAuthAuthenticationNotifications
{
    OnApplyRedirect = context => { /* Content omitted */ },
    OnGetUserInformationAsync = context =>
    {
        var token = new JwtSecurityToken(context.AccessToken);
        var identity = new ClaimsIdentity(token.Claims, context.Options.AuthenticationScheme, "upn", "role");
        context.Principal = new ClaimsPrincipal(identity);
        return Task.FromResult(0);
    }
};
The JwtSecurityToken class does the heavy lifting. We simply give it the
tokens, and it does the rest. I’m using the one from the
“System.IdentityModel.Tokens” NuGet package.
We then create an identity using the claims from the JWT, then assign a new principle to the context. When constructing the ClaimsIdentity, the last two parameters are the name of the claims that contain the username and roles. If these don’t match the name of the claims, then your identity will be authenticated, but they will have no username or roles. These values must match the value of the outgoing claim when we originally set up the claim rules.
Putting it all together, we now have OAuth2 authentication with full support for claims.