Building a NAS
Introduction
Back in July I had a backup drive die. Fortunately I found out before I needed the backup, but regardless it got me worried. It was the only backup drive that I had for that data. It was a personal external drive, and nothing more.
This started off with some innocent intentions where I just wanted to have some external storage for big downloads, keeping VM snapshots, and ISOs. At the time, I was on DSL internet. Downloading an ISO for an operating system was no small feat, so I kept them locally.
This innocent intention eventually evolved in to a drive that had important backups. I wasn’t entirely stupid; real important things like family photos, documents, and source code for projects are backed up in to what we now call “The Cloud”. This drive amassed many virtual machines in specific states with specific software installed, a copy of my personal music collection, and periodic snapshots of my entire workstation. Losing them would not always be fatal, but it would mean hundreds of hours of work, lost.
This drive has clearly gone beyond its intended use, and it is showing signs of wear. It has no redundency in itself. Most disappointingly, I know better. I’ve implemented backup strategies for data storage, HSMs, and databases. I know things fail.
So now I need to fix this in a more permanent way. As appealing as offsite backup to a cloud provider is, it just doesn’t scale the way I need it to. I had not one but three of these fragile external drives, totally several terabytes of data. It’s also needed fairly sporadically, not just when systems fail. Pulling down a 250 GB virtual machine image over the internet isn’t fast as I’d like. Even if I have the bandwidth, the cloud provider likely throttles it. I’ll continue to put backups of real backups in the cloud, but for large local storage, I needed something different.
I needed something like a NAS. I had thought for a while the best way to approach this. Some people recommended off-the-shelf solutions that work well for them. Synology came highly recommended. The alternative choice is go down the DIY route. DIY has come a long way with building a personal storage. There are many barebones solutions out there for building it yourself, customizing it, and throwing disks in it.
I decided to build something myself, completely from scratch. I thought this would be a fun project for me to work on from time-to-time, and I could get as weird and crazy with the project as I wanted. I didn’t really have a budget for this, which in hindsight was probably not the best idea.
In the end, I did have a lot of fun building it. Penny (my daughter) was fascinated by it, and she even helped! Here’s how I built my NAS, and what I learned along the way.
Planning
I did do some planning before I started buying parts. In particular, I needed to know approximately how much storage I needed, what operating system I was going to run this on, and what my long term options are.
FreeNAS is the most ubiquitous operating system I found for building a NAS. This operating system has a lot of traction not just for the hobbyist but also commercially. Its large community and targeted purpose made it appealing. I installed it on a virtual machine just to check it out, and came away fairly impressed. The web-GUI is nice, if not a little complicated. It can easily handle all of the tasks that I wanted it to, which is basically a file share and Time Machine.
FreeNAS also had one other thing that I was keen on using, which is the ZFS file system. ZFS is an interesting file system. It’s modern, at least in contrast to HFS, EXT4, and NTFS. It has quite a number of appealing features, but the main one being that it is geared toward data storage with multiple disks. ZFS is actually a file system that can span multiple disks. Prior to reading about ZFS, I was mulling on the idea of using RAID6. An interesting piece of information with ZFS is that it does not want you to put your disks in a RAID configuration of any kind. I’ll explain later, but this was useful to know when selecting hardware.
The next part was how much storage I need. Right now I have 9 Tb of storage. 3 external drives coming in at 3 Gb each. This meant I wanted at least 9 Tb of storage, ideally more so I don’t have to worry about it too soon. I decided to aim for 12 Tb.
Most importantly, I wanted a set up where a disk could fail and be able to recover from the failure. In fact, the more I did reading on the subject, I needed to be able to handle two disks failing at the same time for reasonable comfort. What I learned is that while it’s not that common for more than one disk to fail at the exact same time, they do tend to fail close to one another because they tend to wear evenly. Worse, I had to worry about the stress on the remaining disks while recovering a disk. Recovering a lost disk, or rebuilding the array, is stressful on the remaining, working, disks. It’s so stressful that it’s not that unlikely that another disk will die while trying to recover first lost one.
So I wanted 12 Tb of storage and allow for 2 disks to fail. This would mean using ZFS’s “RAIDZ2” configuration, which as I understand has the same disk requirements as RAID6. If each disk is 4 Tb, then that means I need 5 disks. I lose two to parity. I’m also going to lose some to file system overhead, I figure it somewhere around 3%.
Finally, I know I wanted space for a few more disks in case I ever want to put in more.
Part Selection
OK! Now that I had an approximate idea of what I wanted, I needed to start planning parts.
I know I need 5 disks, minimum, ideally space for more. Let’s say 8. I also know that I need a drive for the operating system, so that’s potentially 9 disks. FreeNAS suggests running it off a USB thumb drive, actually. But I figure I can just get a dedicated drive for it.
I was also looking to keep things fairly compact, have hot-swap drive support with external bays, and try to keep power-draw to a minimum.
9 disks means I need something more than the SATA slots on the motherboard. To make this fun, I also decided my disks were going to be SAS, not SATA, except for the boot volume, which would go on the motherboard. This means I needed a controller of some kind. As I mentioned earlier, ZFS does not want you using RAID. In fact, it doesn’t want you using a controller than even has RAID capabilities, even if it choose not to use them.
The reason for this is because ZFS assumes there is nothing between the operating system and the disks. The trouble with RAID controllers is they often lie to the operating system. Even if I didn’t set the drives for RAID, they still have their own caches, which can trick ZFS. ZFS really needs to know when data is written to the actual platters (or Flash if you’re using SSDs). The general wisdom then is to avoid a controller and instead find a Host Bus Adapter. A host bus adapter is a device that expands the system’s bus, and has practically no configuration for itself.
Host Bus Adapter
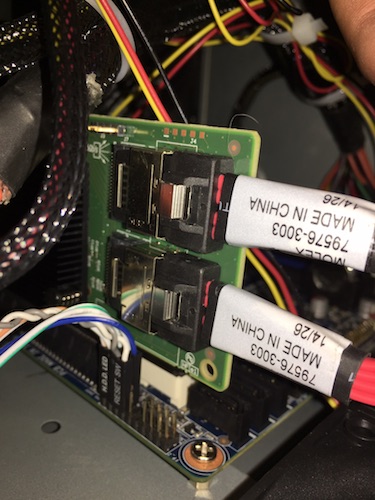
This leads to our first selected part, the LSI 9211-8i HBA. This is an HBA that offers 8 SAS ports. This is also a good option if you don’t plan on using SAS drives, either. Almost all SAS controllers and HBAs also support SATA attachments as well. This is a fairly common selection among the NAS community, apart from my decision to use SAS drives. It’s well known in the FreeNAS community and is known to be a good and a fairly low-budget choice. This HBA actually includes some simple RAID functionality, but later we’ll configure it to ditch the RAID functionality and operate like a no-frills HBA. The card has two SFF-8087 ports. With the right cable, each port breaks out in to 4 SAS ports. If you want an HBA with 4 ports instead of 8, there is a 4 port option as well that comes in a little cheaper.
Motherboard
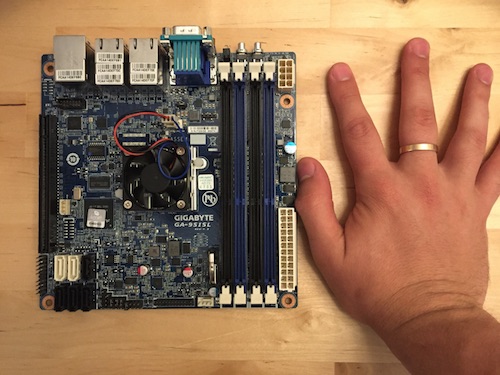
The HBA requires a PCIe 2.0 8x slot, which should give it a theoretical maximum of 4 GB/s back to the system bus. This will be a requirement for the motherboard. Since I wanted a small form factor, I decided to see if I could find a motherboard that was suitable and came in a Mini-ITX form factor. The FreeNAS community again has several suggestions, but I decided to get a litle weird with my selection here. I went with the GIGABYTE GA-9SISL. This is a compact server motherboard. It has 4 ethernet ports (hello Link Aggregation!), a VGA port, a serial port, and a few USB2 ports. That’s it. No audio whatsoever. For the inside, it has slots for 4 DDR3 RAM modules, 2 SATA III ports and 4 SATA II ports, and a single 8x PCIe 2.0 slot.
Did I mention it uses an Intel Atom processor?
That originally scared me off, until I thought about it more. All of the knowledge I have for Intel Atom processors comes from the Netbook days. It didn’t sound impressive. Then I learned that Intel has a whole line of Atom processors meant for lightweight servers. Like a NAS. The exact processor is an Intel Atom C2750, which comes in at 2.4 GHz with eight cores. On paper this started to sounds pretty good. Also, since the motherboard and processor come as a single unit, this makes my part picking easier. I don’t have to pick out the right processor or really even think about it that much. It comes in a little expensive at $448 at the time of purchase.
A motherboard with comparible server features is easily $300 and the cheapest desktop processor, the Intel i3 6300T, is $126 with two cores but a higher clock speed, this was starting to sound like a good deal. The desktop i3 Skylake comes in at 50W of power, while this comes in at approximately 20W.
Ultimately I selected this board because the processor was well suited for the job, power efficient, and a good price considering what you get for it. I am rather happy with this decision even though it’s a little off the beaten path. Having a real server motherboard would prove very useful later, when it came time to update the firmware on the HBA.
RAM
I needed DDR3 RAM. I gave this very little thought beyond finding out that for ZFS to work effectively with the tasks I was going to give it, 8GB was the minimum. So I got 2 4GB modules and called it a day. I still have room for 2 more if the day comes.
Case & Power Supply
With my Mini-ITX motherboard in hand with its single PCIe slot, I needed to find a case. Ideally it would have 8 bays for full-sized 3.5” drives for hot-swapping, have room for the 1 PCIe card, and have good circulation. This was actually the hardest decision for me to make, oddly. However it’s worth noting that if the case doesn’t work out for me or anyone else, it’s easy to transplant all of the other parts in to a new case.
I selected the SilverStone DS380 case, another popular choice among the FreeNAS community. The power supply is separate but SilverStone makes one meant to pair with it. It has 450W of power which should be plenty for my needs.
It supports 8 SAS drives, but I would later find out that I was going to have to give up one of them for a total of 7 bays. This was rather disappointing, but a problem that can be solved when the time comes.
The issue being that the HBA is “in the way” of one of the bays. Fortunately, SilverStone recognized that if you use a PCIe card in their case, it’s very likely to not fit. So they designed a removable panel to make room for the PCIe card at the expense of being able to use of the bays.
The case is also rather cramped, too, but given everything that needed to fit in there, I’m not sure what I was expecting. The case also has a bay for 4 2.5” drives, and this is where I was going to put my OS drive. I ended up doing something else, though.
Operating System Drive
This drive was going to go on the motherboard. FreeNAS recommends a 16 GB drive. In practice, a clean install takes about 2 GB. I figured I could just get a fast yet reliable SSD, so I went to Intel.
Now before this, all of my part purchasing had been done on NewEgg. However, Amazon had a good deal on the drive I wanted, about 10% off. This ended up delaying my NAS build out by a few weeks. The drive came from a reseller, and instead of a shiny new SSD in the delivery box, it was an alarm clock. This caused about 3 weeks of whining at the reseller and Amazon to finally get a full refund.
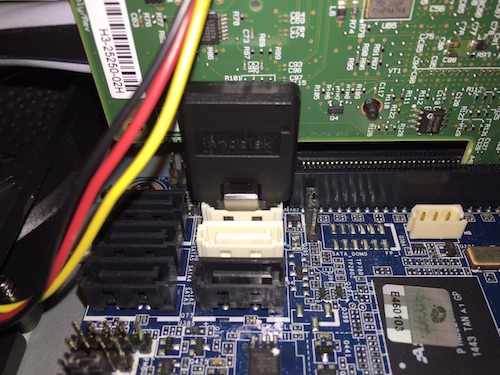
While I was waiting for that whole mess to blow over, I was doing more research and found out about Disk-on-Module drives. Think of it like a thumb drive for a SATA port. Normally SATA ports don’t deliver power (an obnoxious quality for the brief popularity of eSATA). However some motherboards can deliver power over a SATA port by turning one of the GND pins in to a +5v. As it so happened, the motherboard I selected did support this form of power called Pin-7 power by setting a jumper.
The SATADOM drive I selected was about the same price as the Intel SSD, but only 16 GB. However, it’s fast. Fast enough to completely saturate a SATA III port and is also an SLC flash drive. This can offer better reliability and a longer life span.
Losing the OS drive isn’t actually a big deal with FreeNAS, you can just put in a new drive and re-install FreeNAS, and then import your ZFS disk array back in to it. The configuration is easy enough to back up.
The SATADOM turned out to be a good and bad idea. Bad, because it took 2 whole months to deliver. The drive I selected was a ServerDOM by Innodisk, and they don’t sell in normal places like NewEgg or Amazon at the time I purchased it. I had to find a bulk reseller that was willing to sell me one, and it came from mainland China. It was good because in the end, it worked quite well.
This meant I could remove the enclosure for the 2.5” internal drives in the case, which gave the case considerable more space and room to work.
Data drives
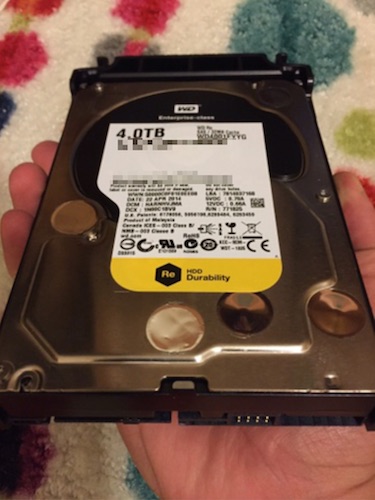
Now for the drives where I’m actually going to put the data and make part of my ZFS pool. Since I early on decided that I wanted SAS drives, the Western Digital Re drives at 4 Tb seemed appropriate. They have good reviews and a good data warranty from Western Digital. They are also price competitive for SAS drives.
At 4 Tb, I needed 5 to hit my storage goals. At a lofty $200 each, this wasn’t cheap, but I’m pleased with the results so far. Unfortunately reviewing a drive is best done a year after it’s put in to production, and as of now they’ve been used for a few weeks. From what I’ve seen these few weeks, the drives are good. They operate quitely, don’t put out a tremendous amount of heat, and vibrate very little.
I’ll perhaps post a longer peice some time on the drive selection decisions, and stop playing coy with my reasoning behind SAS over SATA.
Miscellaneous
The last part is cables for the HBA to the backplane of the case. I used 3ware CBL-SFF8087OCF-05M cables. You need 1 per SFF-8087 port, which our HBA has 2. You may also need different cables depending on the backplane of your case. Note that SAS ports look identical to SATA ports, and that’s why you can plug a SATA drive into a SAS port. Many of the cables will describe themselves as “SATA” cables when they are perfectly suitable for SAS.
Building
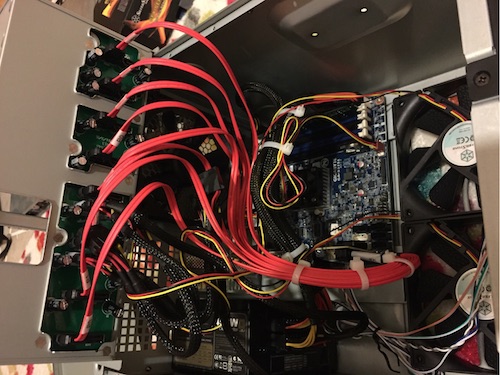
Phew! That’s more than I wanted to write about part selection. Building everything was straight forward. The case was a tight fit and offered no cable management, but after everything was done, I zip-tied everything up and made sure the fans weren’t blocked and air could move around well.
The case and motherboard are a bit of an odd pair, but they work. Apart from the case being too thin and losing a drive bay, the motherboard doesn’t support a USB header. So there are two dead USB ports on the front of the case, which doesn’t bother me, but is a perhaps the only odd thing I’ve experienced with the motherboard.
The motherboard’s documentation for connecting power / reset switches to it is also actually wrong, too. The markings on the motherboard are right. Specifically, the manual says that pin 5 is “Power LED Signal cathode (-)” when it is actually a GND pin. The motherboard is etched with GND. I submitted errata to the vendor to update their online PDF version of the manual. Time will tell if they ever fix it.
Installing FreeNAS and Firmware
FreeNAS was very easy to install. Following their instructions on creating a bootable USB drive worked fine, and the usual incantation of mashing F12 during boot to get to drive selection let me select it as the boot drive. The installer had no problems recongizing the SATADOM drive, and we were off.
Once FreeNAS was up and running, I went through the motions of configuring it via the WebGUI. It has a nice wizard at the beginning, which I skipped because I wasn’t ready to make my ZFS pool.
FreeNAS had the correct driver for my HBA. The version of the driver was “P20” which is the most up-to-date version of the driver. However, the firmware on the controller was P17. My HBA came with an old firmware. FreeNAS insists that the firmware version and the driver version pair with each other, and for good reason. As I mentioned earlier, ZFS just flat out won’t work safely unless it knows that data has been written. If the driver and firmware aren’t paired correctly, then this safety will fall apart.
Fortunately LSI makes it easy to download new versions of the firmware. No support portals or anything like that. However, it is not a task that took me just a few minutes.
Even when I downloaded the new firmware, I wasn’t sure what I was supposed to do with it. The documentation for it is unhelpful at best, and seemed geared towards making Windows an easy experience. The next option that seemed the least painful for me was to use the EFI shell. Think of this as an extremely limited command line environment that the motherboard directly supports.
I actually had a hard time even finding the new firmware images in the download. It turns out the actual raw images of the firmware you will need for the EFI attempt are in the “Windows” download ZIP. Once you have the zip, you need 3 files.
And here we have a choice. Remember I said that the HBA has some RAID-like qualities? This mode of the HBA is the “IR” mode. The other mode, “IT”, disables all of the RAID capabilities of the HBA and gives us a clean HBA. We want to flash it with the IT firmware.
The first is sas2flsh, which is an executable used to install firmware images.
The next is 2118it.bin, which is the firmware for the controller. The final
file is mptsas2.rom which is the BIOS bootload firmware.
Throw these 3 files on a FAT32 thumb drive and boot in to an EFI shell.
Now, with this utility you don’t just install new firmware overtop of the
existing firmware. You have to delete the firmware first, then add the new one.
First from the EFI shell you need to CD to the right drive. Like DOS / CMD, you
just type the drive letter and a colon, like fs1:. You can use map in an EFI
shell to show attached devices.
So I started with this,
sas2flash.efi -o -e 6
Which erases the firmware from the HBA. Note that this command is not universally correct - if you aren’t using the 9211, then you need to verify all of the commands.
By the way, don’t turn the computer off at this point. Your HBA has no firmware. If it loses power at this point, the instruction manual sternly warns you that your HBA is now bricked.
Now to install the new firmware:
sas2flash.efi -o -f 2118it.bin -b mptsas2.rom
If all goes as planned, you can reboot back in to FreeNAS and have matching firmware and drivers.
Wrapping up
That’s it for actually building the NAS. I hope to next write about actually configuring FreeNAS, the ZFS pool, and other things I learned about the software.