-
macOS Platform Invoke
I started foraying a bit in to macOS platform invocation with .NET Core and C#. For the most part, it works exactly like it did with Windows. However, there are some important differences between Windows’ native APIs and macOS’.
The first is calling convention. Win32 APIs are typically going to be
stdcallon 32-bit or the AMD64 calling convention on 64-bit. That may not be true for 3rd party libraries, but it is true for most (but not all) Win32 APIs.MacOS’ OS provided libraries are overwhelmingly
cdecland have a similar but different calling convention for AMD64 (the same as the System V ABI).For the most part, that doesn’t affect platform invoke signatures that much. However if you are getting in to debugging with LLDB, it’s something to be aware of.
It does mean that you need to set the
CallingConventionappropriately on theDllImportAttribute. For example:[DllImport("libcrypto.41", EntryPoint = "TS_REQ_set_version", CallingConvention = CallingConvention.Cdecl) ]Another point is that MacOS uses the LP64 memory model, whereas Windows uses the LLP64 for types.
A common Win32 platform invocation mistake is trying to marshal a native
longto a managedlong. The nativelongin Win32 is 32bits, whereas in .NET it is 64-bit. Mismatching them will do strange things to the stack. In Win32 platform invocation, a nativelonggets marshalled as anint. Win32 will uselong longorint64_tfor 64-bit types.MacOS is different. It’s
longtype is platform dependent. That is, on 32-bit systems thelongtype is 32-bit, and on 64-bit it is 64-bit. In that regard, thelongtype is most accurately marshalled as anIntPtr. The alternative is to provide two different platform invoke signatures and structs and use the appropriate one depending on the platform.Keep in mind with MacOS, MacOS is exclusively 64-bit now. It’s still possible that one day your code will run 32-bit on a Mac as it is still capable of running 32-bit. At the time of writing even .NET Core itself doesn’t support running 32-bit on a Mac.
[DllImport("libcrypto.41", EntryPoint = "TS_REQ_set_version", CallingConvention = CallingConvention.Cdecl) ] public static extern int TS_REQ_set_version ( [param: In] TsReqSafeHandle a, [param: In, MarshalAs(UnmanagedType.SysInt)] IntPtr version );Using
IntPtrfor thelongtype is a bit of a pain since for, whatever reason, C# doesn’t really treat it like a numeric type. You cannot create literals ofIntPtrcleanly, instead having to do something like(IntPtr)1.A final possibility is to make a native shim that coerces the data types to something consistent, like
int32_tand have a shim per architecture.Another point of difference is string encoding. Windows vastly prefers to use Unicode and ANSI strings (W or A), where MacOS libraries will frequently use UTF8. The easiest thing to do here is to marshal them as pointers, unfortunately.
Overall, it’s not too much different. Pay attention to the calling convention and be aware of LP64 over LLP64.
-
Peeking at RubyGems Package Signing
I last wrote about NuGet signing for packages. This has been a hot topic for some folks in the approach that is being taken. However, signing packages was something I didn’t have a whole lot of data on. I didn’t have a good feel for how package communities adopt signing, and decided to get a little more information.
I turned to the RubyGems community. Gems support signing, also with X509 certificates like the NuGet proposal. Support has been there for a while, so the community there has been plenty of time for adoption. This is on top of a high profile hack on RubyGems, giving plenty of motivation for developers to consider signing their packages.
Problem is, there isn’t a whole lot of information about it that I could find, so I decided to create it. I decided to look at the top 200 gems and see where they stood on signing.
The Gems
The top 200 list is based off of RubyGems own statistics. One problem: their list by popularity only gives up to 100 gems. Fortunately, RubyGems doesn’t do such a hot job on validating their query strings. If I change the
page=10URL query string, supposedly the last page, topage=11, it is quite happy to give me gems 101-110. So first problem solved.Many of these gems are supporting gems. That is, not gems that people typically include in their projects directly, but rather included by as a dependency of another gem.
Getting the latest version of each gem is easy enough with
gem fetch. After building our list of gems, we just cache them to disk for inspection later.Extracting Certificates
Certificates can be extracted from gems using
gem spec <gempath> cert_chain. This will dump the certificate chain as a YAML document. We can use a little bit of ruby to get the certificates out of the YAML document and as files on disk.The Results
I will be the first to admit that 200 gems is not a huge sample. However, they represent the most popular gems and the ones I would typically expect to be signed.
Of the 200 gems specified, 17 were signed. That’s approximately 12% of gems. Initially I didn’t know what to think of that number. Is it good? Is it bad? If you had asked me to guess, I would have thought only three or four of them would have been signed. I don’t think 17 is good, either. It’s just not as bad as I would have expected it to be.
The next matter is, what is the quality of the signatures? Are they valid? Are they self signed? What digest algorithms and key sizes are used?
Of the 17 signed gems, two of them weren’t really signed at all. They contained placeholders for the certificate to go. Indeed, performing
gem install badgem -P HighSecurityresulted in Gem itself thinking the signature was invalid. So we are down to 15 signed gems.Some other interesting figures:
- 15/15 of them were self signed.
- 2/15 of them used SHA2 signature algorithms. The rest used SHA1.
- 4/15 were expired.
- 8/15 used RSA-2048; 1/15 used RSA-3072; 6/15 used RSA-4096.
Data
I set up a GitHub repository for the scripts used to create this data. It is available at vcsjones/rubygem-signing-research. Everything that you need to extract the certificates from Gems is there.
The
gemlist.txtcontains the list of Gems examined. Thefetch.shscript will download all of the Gems in this file.extract_certs.shwill extract all of the certificates to examine how you see fit.Thoughts
It doesn’t seem like signing has really taken off with RubyGems. Part of the issue is that RubyGems simply doesn’t validate the signature by default. This is due to the default validation option in Gem being
NoSecurityat the time of writing. Every single Gem that is signed would fail to install with theMediumSecuritytrust policy:gem install gemname -P MediumTrustThis will fail for one reason or another, usually because the certificate doesn’t chain back to a trusted root certificate.
I’m not sure if this is indicative of how adoption will go for NuGet. I’m curious to see where NuGet is three years from now on signing.
-
NuGet Package Signing
Recently the NuGet team announced they were going to start supporting package signing.
The NuGet team announced that their solution would be based on x509, or PKI certificates from a traditional Certificate Authority. They haven’t announced much beyond that, but it’s likely to be just a plain Code Signing certificate with the Code Signing EKU. Certificates and PKI is not a perfect solution. Particularly, one of the problems around code signing certificates is the accessibility of them. Certificate Authorities typically charge for certificates and require identification.
This presents a problem to a few groups of people. Young people who are just getting in to software development may be excited to publish a NuGet package. However getting a code signing certificate may be out of their reach, for example for a 15 year old. I’m not clear how a CA would handle processing a certificate for a minor who may not have a ID. The same goes for individuals of lesser privileged countries. The median monthly income of Belarus, a country very dear to me, is $827. A few hundred dollars for a code signing certificate is not nothing to sneeze at. There are many groups of people that will struggle with obtaining a certificate.
Not signing might be okay, with a few exceptions. The first being that the NuGet team described that there would be a visual indicator for signed packages.
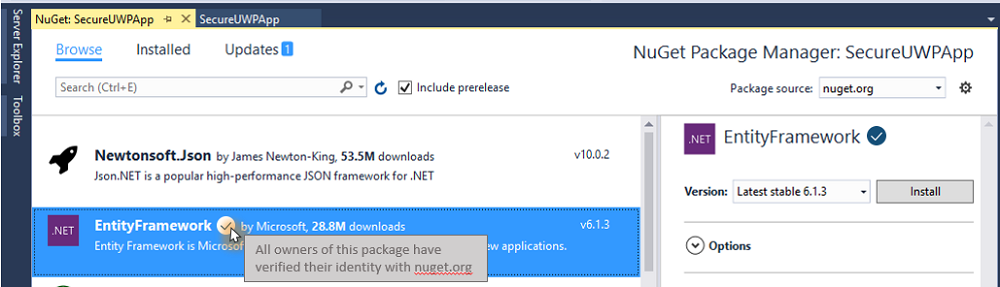
This indicator is necessary for part of the NuGet team’s desire to indicate a level of trustworthiness. However, as a package consumer, the indicator will likely draw preference. This puts packages that are able to sign in a position of preference over unsigned packages. This also hurts the community as a whole; it’s simply better for everyone if as many packages as possible were signed.
Given that, the natural conclusion may be that x509 and PKI are not the correct solution. There are other options that will work, such as PGP and Web of Trust (WOT). Some members are asking the NuGet team to reconsider x509 and PKI. There are other issues with x509 and PKI, but the accessibility of code signing certificates seems to be the central point of the community’s concerns.
I am sympathetic to these concerns which I have also expressed myself previously. However despite that, I would like to now explain why I think the NuGet team made the right decision, and why the other options are less likely to be workable solutions.
PKI
x509 Code Signing certificates use Public Key Infrastructure, or PKI for short. The hardest part of signing anything with a key is not a technical problem. It is “Should I trust this key?”. Anyone in the world can make a certificate with a Common Name of “Kevin Jones” and sign something with it. How would you, the consumer of NuGet package signed by CN=Kevin Jones, know that the certificate belongs to Kevin Jones?
The PKI solution for that is to have the certificate for CN=Kevin Jones to be signed by someone you already trust, or in this case a Certificate Authority. The CA, since they are vouching for your certificate’s validity, will vet the application for the certificate. Even when I applied for a free Code Signing certificate (disclosure, Digicert gives free certs to MVPs, which I am grateful for), they still performed their verification procedures which involved a notarized document for my identification. CAs are motivated to do this correctly every time because if they prove to be untrustworthy, the CA is no longer trusted anymore. The CA’s own certificate will be removed or blacklisted from the root store, which operating systems maintain themselves, usually.
While this has problems and is not foolproof, it has been a system that has worked for quite a long time. x509 certificates are well understood and also serve as the same technology as HTTPS. There is significant buy in from individuals and businesses alike that are interested in the further advancement of x509. Such advancements might be improved cryptographic primitives, such as SHA256 a few years ago, to new things such as ed25519.
A certificate which is not signed by a CA, but rather signs itself, is said to a self-signed certificate. These certificates are not trusted unless they are explicitly trusted by the operating system for every computer which will use it.
A final option is an internal CA, or enterprise CA. This is a Certificate Authority that the operating system does not trust by default, but has been trusted through some kind of enterprise configuration (such as Group Policy or a master image). Enterprises choose to run their own private CA for many reasons.
Any of these options can be used to sign a NuGet package with x509. I’m not clear if the Microsoft NuGet repository will accept self signed packages or enterprise signed packages. However an enterprise will be able to consume a private NuGet feed that is signed by their enterprise CA.
This model allows for some nice scenarios, such trusting packages that are signed by a particular x509 certificate. This might be useful for an organization that wants to prevent NuGet packages from being installed that have not been vetted by the corporation yet, or preventing non-Microsoft packages from being installed.
Finally, x509 has not great, but at least reasonably well understood and decently documented tools. Let’s face it: NuGet and .NET Core are cross platform, but likely skew towards the Windows and Microsoft ecosystem at the moment. Windows, macOS, and Linux are all set up at this point to handle x509 certificates both from a platform perspective and from a tooling perspective.
PKI is vulnerable to a few problems. One that is of great concern is the “central-ness” of a handful of Certificate Authorities. The collapse of a CA would be very problematic, and has happened, and more than once.
PGP
Let’s contrast with PGP. PGP abandons the idea of a Certificate Authority and PKI in general in favor for something called a Web of Trust. When a PGP key is generated with a tool like GPG, they aren’t signed by a known-trustworthy authority like a CA. In that respect, they very much start off like self-signed certificates in PKI. They aren’t trusted until the certificate has been endorsed by one, or multiple, people. These are sometimes done at “key signing parties” where already trusted members of the web will verify the living identity to those with new PGP keys. This scheme is flexible in that it doesn’t rely on a handful of corporations.
Most importantly to many people, it is free. Anyone can participate in this with out monetary requirements or identifications. However getting your PGP key trusted by the Web of Trust can be challenging and due to its flexibility, may not be be immediately actionable.
It’s likely that if NuGet did opt to go with PGP, a Web of Trust may not be used at all, but rather to tie the public key of the PGP key to the account in NuGet. GitHub actually does something similar with verified commits.
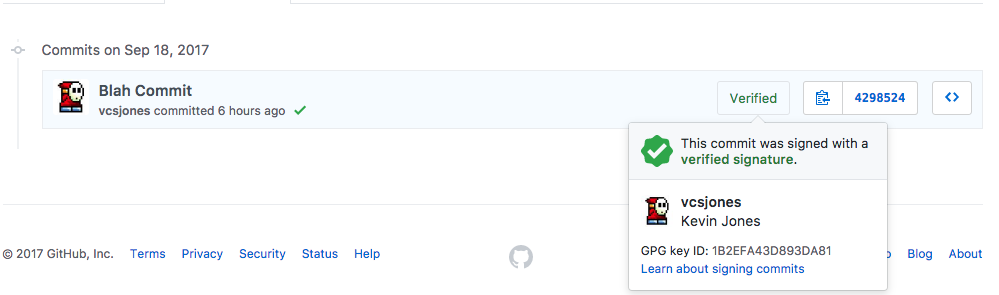
This, however, has an important distinction from an x509 code signing certificate: the key does not validate that Kevin Jones the person performed the signature. It means that whoever is in control of the vcsjones Github account performed the signature. I could have just as easily created a GitHub account called “Marky Mark” and created a GPG key with the email markymark@example.com.
That may be suitable enough for some people and organizations. Microsoft may be able to state that, “our public key is ABC123” and organizations can explicitly trust ABC123. That would work until there was a re-keying event. Re-keying is a natural and encouraged process. Then organizations would need to find the new key to trust.
This is harder for individuals. Do I put my public key on my website? Does anyone know if vcsjones.dev is really operated by someone named Kevin Jones? What if I don’t have HTTPS on my site - would you trust the key that you found there?
Adopting in to the “web of trust” tries to work around that problems of key distribution. However the website evil32.com puts it succinctly:
Aren’t you suppose to use the Web of Trust to verify the authenticity of keys?
Absolutely! The web of trust is a great mechanism by which to verify keys but it’s complicated. As a result, it is often not used. There are examples of GPG being used without the Web of Trust all over the web.
The Web of Trust is also not without its problems. An interesting aspect of this is since it requires other users to vouch for your key, you are now disclosing your social relationships, possibly because you are friends with the other people used to vouch for the key.
It also has a very large single point of failure. Anyone that is part of the strong set is essentially a CA compared to x509 - a single individual compromised in the strong set could arguably be said to compromise the entire web.
For those reasons, we don’t see the WOT used very often. We don’t see it used in Linux package managers, for example.
Linux, such as Debian’s Aptitude, use their own set of known keys. By default, a distribution ships with a set of known and trusted keys, almost like a certificate store. You can add keys yourself using
apt-key add, which many software projects ask you to do! This is not unlike trusting a self signed certificate. You have to be really sure what key you are adding, and that you obtained it from a trustworthy location.PGP doesn’t add much of an advantage to x509 in that respect. You can manually trust an x509 just as much as you can manually trust a PGP key.
It does however mean that the distribution now takes on the responsibilities of a CA - they need to decide which keys they trust, and the package source needs to vet all of the packages included for the signature to have any meaning.
Since PGP has no authority, revoking requires access to the existing private key. If you did something silly like put the private key on a laptop and lose the laptop, and you didn’t have the private key backed up anywhere, guess what? You can’t revoke it without the original private key or a revoke certificate. So now you are responsible for two keys: your own private key and the certificate that can be used to revoke the key. I have seen very little guidance in the way of creating revoke certificates. This isn’t quite as terrible as it sounds, as many would argue that revocation is broken in x509 as well for different reasons.
Tooling
On a more personal matter, I find the tooling around GnuPG to be in rough shape, particularly on Windows. It’s doable on macOS and Linux, and I even have such a case working with a key in hardware.
GPG / PGP has historically struggled with advancements in cryptography and migrating to modern schemes. GPG/PGP is actually quite good at introducing support for new algorithms. For example, the GitHub example above is an ed25519/cv25519 key pair. However migrating to such new algorithms is has been a slow process. PGP keys have no hard-set max validity, so RSA-1024 keys are still quite common. There is little key hygiene going on and people often pick expiration dates of years or decades (why not, most people see expiration as a pain to deal with).
Enterprise
We mustn’t forget the enterprise, who are probably the most interested in how to consume signed packages. Frankly, package signing would serve little purpose if there was no one interested in the verify step - and we can thank the enterprise for that. Though I lack anything concrete, I am willing to bet that enterprises are able to handle x509 better than PGP.
Wrap Up
I don’t want to slam PGP or GnuPG as bad tools - I think they have their time and place. I just don’t think NuGet is the right place. Most people that have interest in PGP have only used it sparingly, or are hard-core fanatics that can often miss the forest for the trees when it comes to usable cryptography.
We do get some value from PGP if we are willing to accept that signatures are not tied to a human being, but rather a NuGet.org account. That means signing is tied to NuGet.org and couldn’t easily be used with a private NuGet server or alternative non-Microsoft server.
To state my opinion plainly, I don’t think PGP works unless Microsoft is willing to take on the responsibility to vet keys, we adopt in to the web of trust, or we accept that signing does not provide identity of the signer. None of these solutions are good in my opinion.
-
Single Cable USB-C
I had a pretty simple dream. I have a 4K monitor, a touch pad, keyboard, and a few computers between Lena and I. The dream was to have a single cable to connect a computer to this set up.
I generally love the Mac keyboard and track pads. The second version of these can also work with vanilla USB instead of bluetooth, which is great for a docking setup. No need to do any re-pairing of the devices or shuffling things around on my desk.
The single cable desire came from that fact that one of the computers is a MacBook. Not a pro, the 12” MacBook with a single USB-C port. Single cable, including charging, was a necessity.
I thought this would be easy. Turns out, not so much. I went through a few different docks or “dongles” trying to find the one that made the right trade offs.
Why not Thunderbolt?
Two reasons. The first being that the MacBooks don’t do Thunderbolt, only USB-C. They use identical ports, and Thunderbolt 3 ports can also double as a USB-C port, but not the reverse. Thunderbolt 3 docks, while expensive, can typically do everything over a single cable, and they do it well. I’ve had experience with that going back to the 2011 Thunderbolt Display that Apple introduced.
Generally now I am hesitant to adopt in to a Thunderbolt set up. While at the time of purchasing the Thunderbolt display I had all-thunderbolt devices, that isn’t true today, and they didn’t work with the Thunderbolt display.
Because of that, I don’t want to invest heavily in a set up that might not work for me in the future. Instead, I wanted a regular monitor that had a variety of different inputs. DisplayPort, HDMI, mDP, etc and also a little USB hub.
The monitor
I settled on the advice of many. The Dell P2715Q. It’s a good 4K monitor for a software developer. It looks great, has bezels but I don’t really care about that, and has all of the inputs I wanted. Not much of an issue there.
Docks
This is where I started learning that despite some people’s belief that USB-C was going to obsolete Thunderbolt 3, they were not correct. USB-C and USB 3.1 Gen 2 seem to have a ways to go to catching up to Thunderbolt.
Here was my wish list from a hub or dock, in the order that I consider them.
- Pass-through power
- 4K Resolution for Display
- 60 Hz refresh rate for Display
- USB Hub
- Ethernet
There is no device on the market at the time or writing that hits all of these. Some, like the Arc Hub, are really close, but misses one mark which I’ll talk about later.
Pass Through Power
The first, pass through power, is a requirement for the 12” MacBook. It literally has only one port, including the one for charging it. Pass through power allows charging the device and using the port for USB at the same time. It sounds simple, but it’s not. There are a few problems here.
The first is how much power is can pass-through. It’s not as simple as passing power through. Some hubs or docks can deliver 30 watts or so, others can go up to 60 watts, etc. Depending on the charging needs of your computer, it’ll either charge your computer very slowly, or not at all, depending on how much power it can deliver.
The second that I’ve heard is that some hubs work fine when there is no pass through power connected, but then certain things start acting strange depending on the computer and power supply. Apple hardware doesn’t vary much in that regard, so I hoped this wouldn’t be an issue with a Mac.
The Display
I’m going to discuss the next two together because they go together, and can often fight each other. 4K monitors can do a few different modes. They can do 4K@60Hz, 4K@30Hz, or 1080p@60Hz. The type of connector used and the settings on the computer determine which is the best that you’re going to get.
4K@60Hz requires a modern connector. HDMI 2.0 or DisplayPort 1.2. If your computer’s graphics can do 4K and you have an output port of one of those two kinds, then you get do 4K@60Hz. If not, then you will have to choose between 2K@60Hz or 4K@30Hz.
The resolution of 4K is nice, but 60Hz refresh rate should be a bare minimum. Having seen 30 Hz playing around with settings, it’s quite choppy in its appearance for things like dragging or animations.
Finding a single USB-C dock that could drive even one display at 4K@60Hz was a challenge. To make this a little more complicated, I was slightly mislead by USB-C a little bit.
Let me explain. I have a USB-C to HDMI 2.0 cable. It works great, plug one end in to USB-C, plug the other in to the monitor, and instant 4K@60Hz. It shouldn’t be much of a stretch to add inline power and USB hub, right? That’s where I went astray. USB-C includes alternate modes, where the it has a physical port of USB-C, but isn’t actually USB-C. This cable was using USB-C’s alternate mode. It was not doing anything USB related, it was just acting like an HDMI 2.0 port with a USB-C interface.
After doing some reading on this matter, I believe I came to the conclusion that a USB-C port cannot offer USB-C data and HDMI 2.0 at the same time - only HDMI 1.4b. So the 4K works, but with a 30 Hz refresh rate. To get the 4K@60Hz, I needed to find a docking solution that had DisplayPort, where the USB-C spec did use DisplayPort 1.2.
This was quite the treasure hunt.
USB Hub
The monitor itself has a USB Hub, I just need somewhere to connect it to on the hub. This is used for a keyboard and a track pad. That’s really it. If I really needed a USB port with raw speed, I would use one of the other ports on the computer - it just wouldn’t be part of the docking setup.
Ethernet
This was a nice-to-have. WiFi 802.11ac Wave 2 is generally good enough for me, I can still make use of my near-gigabit internet connection, and the minor latency penalty isn’t trouble. The APs are rock solid in my house. Though, if a dock had an Ethernet port, I wouldn’t pass up the opportunity to have it if it came down to putting the money in.
Shopping
I initially used the Apple HDMI dongle. It has power pass-through, 1 USB port, and HDMI. Everything worked great except the 4K@60Hz, which I eventually figured out I would never get working. Still, I like this little dongle for travelling.
It would take me one more attempt at purchasing an HDMI hub and dongle before I caught on that HDMI and USB-C just don’t do the 4K with the right refresh rates. This was complicated by the fact that some manufacturers don’t label the refresh rate. One reviewer of a product said the HDMI did 4K@60Hz, but I have to believe that reviewer was mistaken. Lesson learned: only buy a hub where the specs are completely spelled out, and reviewers aren’t disputing them.
I was initially going to pull the trigger on the Arc Hub, something that The Verge gave very glowing remarks to. I came within moments of purchasing one, except reading the Compatibility section carefully…
It is also a known issue that 4K@60hz is not being supported via MDP using a MacBook Pro despite having the capability to do so. Our engineers are thoroughly looking into the issue and will update with any new info.
That’s rather disappointing! I hope they fix the issue, and if they do, I will certainly consider revisiting purchasing one of them. I am very pleased that they were up-front about the compatibility issue in the first place, so I am not going to discount them. Their technical specifications are impeccably documented.
I then took a look at the “HyperDrive USB-C Hub with Mini DisplayPort”. This hit a few good points. It’s specifically documented as supporting 4K@60Hz, pass through power, and 2 USB 2.0 ports. USB 3.0 would be nice, but, I’ll take it.
The only other thing was it really isn’t a single “cable” solution. It was just a little dongle with no cable at all. This was less pleasant because three thick cables were connected to it, and wrestling it in to place was annoying. It also meant that I would have three cables across my desk. This problem ended up being easy to fix with a USB-C extension cable.

Overall, I’m a tad annoyed by the experience of this. USB-C is confusing and difficult to find the right components, whereas Thunderbolt is in it’s 3rd iteration and it seems that many of its problems have been addressed since using the Thunderbolt Display.
-
Subject Interface Packages - Part 2
In part 1 of Subject Interface Packages, we left off being able to sign a custom file type, but not verify it. Here we are going to implement the two functions to perform verification.
This is in some ways, the reverse of what we did in the previous part. Instead of injecting the signature data in to the file, we need to extract it, and instead of creating a digest, we need to create and compare the digest.
Get Signed Data Message
The last part we did was “putting” the signature data, now we need to do the reverse. Given a file handle, get the signed data message.
BOOL WINAPI PngCryptSIPGetSignedDataMsg(
    SIP_SUBJECTINFO *pSubjectInfo,
    DWORD* pdwEncodingType,
    DWORD dwIndex,
	DWORD *pcbSignedDataMsg,
    BYTE *pbSignedDataMsg
)
The purpose of this function is that upon successful completion,
pbSignedDataMsgwill point to the signed data message that we embedded in the file withCryptSIPPutSignedDataMsg.Other things that will need to be set is the
pcbSignedDataMsgwhich is the size of the signed data message, andpdwEncodingTypewhich is the encoding type.We can knock out
pdwEncodingTypeeasily because we can set it to an either/or as we see in many of the other CMS APIs://TODO: validation *pdwEncodingType = X509_ASN_ENCODING | PKCS_7_ASN_ENCODING;The authenticode process will call this function twice. Once with
pbSignedDataMsgpointing to NULL, and it is expected thatpcbSignedDataMsgwill be set with the size of the buffer that Win32 should allocate. The second call to the function will havepbSignedDataMsgpointing to a buffer of memory that is at least as big as the the indicated size from the first call.A pseudo-code implementation would look something like this:
BOOL WINAPI PngCryptSIPGetSignedDataMsg(
    SIP_SUBJECTINFO *pSubjectInfo,
    DWORD* pdwEncodingType,
    DWORD dwIndex,
	DWORD *pcbSignedDataMsg,
    BYTE *pbSignedDataMsg
) {
    //TODO: validation
    *pdwEncodingType = X509_ASN_ENCODING | PKCS_7_ASN_ENCODING;
    if (NULL == pbSignedDataMsg) {
        DWORD size;
        if (GetSignedDataMsgSize(pSubjectInfo->hFile, &size)) {
            *pcbSignedDataMsg = size;
            return TRUE;
        }
        return FALSE;
    }
    return GetSignedDataMsg(pSubjectInfo->hFile, pcbSignedDataMsg, pbSignedDataMsg));
}
Where
GetSignedDataMsgwill fillpbSignedDataMsgwith the data message.You don’t have to do any verification with this. Internally, Win32 will use
CryptVerifyMessageSignatureto verify the message and integrity of the signature itself.If you are having trouble at this step, it’s worth pointing out that you can call
CryptVerifyMessageSignatureyourself at this point to verify that you’re extracting the signature from the file correctly. You should also be able to run this through an ASN.1 decoder and see properly decoded output.It should also be byte-for-byte identical to the “put” operation in part 1, so you can compare at these two steps.
Verify Indirect Data
The last step is to verify the hash that was signed.
BOOL WINAPI PngCryptSIPVerifyIndirectData(
    SIP_SUBJECTINFO *pSubjectInfo,
    SIP_INDIRECT_DATA *pIndirectData)
The first parameter gives us information about the file being verified. In this step you will need to re-hash the file, just the same way that was done in the very beginning. You then need to compare this hash with
pIndirectData->Digest.pbData.If the hashes match, you should return TRUE and use
SetLastErrortoERROR_SUCCESSto indicate the hash is correct. If the hashes are not equal, you should return FALSE and useTRUST_E_SUBJECT_NOT_TRUSTEDwithSetLastErrorto indicate that there was no unexpected error, just that the signatures do not match.pIndirectData->Digestwill contain the digest algorithm. Valid that it is correct, and that the parameters are what you expect. In cases for digests used for authenticode digests, the parameters will either be a literal NULL or more likely, {0, 5} as an ASN.1 NULL.Final Thoughts
This is a rough beginning on writing a SIP. As mentioned in the first post, a GitHub project for a PNG SIP exists and can perform these basic operations. As a reminder, this code exists for demonstration purposes, and not for any real-world use.
There is still plenty to do in later parts. As of now, we cannot:
- Remove a signature
- Timestamp
- Dual Sign
- Seal
I hope to get to these soon for this project. More curiously, a slightly-related subject has me to believe this can be done in Rust. I don’t think it’s a stretch either, or an abuse. Rust seems well suited for the task without going down to C or C++.
The last part, sealing, is a ways off, because the details of sealing signatures is not public yet, and are known only due to some careful inspection.