-
Subject Interface Packages - Part 1
Authenticode continues to be an area of interest for me, and the surprisingly little documentation around some of its features remains an issue for others. Authenticode is interesting because it can sign a variety of formats. Executables and libraries (PE files), MSI installers, CAB files, and more recently APPX packages, which are used to distribute things in the Windows Store.
The Authenticode process has seemingly simple process of creating a canonical digest of the file, signing it, and embedding the signature in the file. This simple task requires Authenticode to actually understand the file format. Take an executable as an example. Authenticode must first create a digest of this file. However, it cannot do so by simply hashing the whole file. It must be intelligent to ignore certain parts of the file, including where the signature itself will go. When it comes time to validate the signature, the Authenticode process will first validate that the signature on the embedded hash is correct, then re-hash the file and compare the hashes. If during the re-hash process it were to include the embedded signature, then the hashes would not be equal.
Authenticode must further be smart enough to understand how to embed the signature in a file that doesn’t corrupt the file itself. PE files have specific regions for placing digital signatures called the certificate section. Finally, Authenticode must be able to do this for every file type that it can sign.
Now if I were a good software architect, I would design the Windows components of Authenticode to create an abstraction over understanding file types. Perhaps something like the bridge pattern in software design. Fortunately for us, we do have something like the bridge pattern between the signing and understanding a file’s format: Subject Interface Packages.
Subject Interface Packages, or “SIP” (referred to as such going forward), are a way to extend the types of files that Authenticode can understand how to sign and verify. Windows uses SIPs internally for its own file formats, but it’s actually something anyone can use.
If you can develop a SIP, then you can teach Authenticode new file formats, including giving
signtoolthe knowledge to sign a file, and Explorer the ability to show the “Digital Signatures” tab on a file.To help make this a bit more digestible, I included a fully-functioning SIP for signing PNG files over on GitHub.
SIP Basics
Under the covers, Windows’s signing operations uses
SignerSignEx*to Authenticode sign files. The most recent versions of Windows useSignerSignEx3, while older ones useSignerSignEx2.A typical signing operation, loosely, has a few key phases. First, a digest of the file needs to be made. Second, the digest needs to be signed. In Authenticode, this is done with CMS style messages that result in a big chunk of PKCS#7 data. Third, and finally, the CMS message needs to be embedded in the file, somehow. The embedded signature should not affect the behavior of the file.
A SIP allows you to extend the first and third steps, but not the second. A SIP does not allow you to modify the entire Authenticode process, though there are some ways (to be discussed another day) to allow modifying the actual signing step. This means a SIP does not allow you to to do something other than Authenticode or support any possible digital signing scheme, like XmlDSig. It’s still Authenticode-style CMS signature and SignerSignEx does step two for you, including the certificate selection, private key locating, etc.
Developing a SIP has a few requirements of the file format itself, mainly that the file format needs to support some way of embedding the signature without breaking the file itself.
Using PNG as an example, I can’t just put the signature at the end of the file. An image viewer would see those bytes, and not know what to do with them, and assume the file is corrupt. Fortunately for us, the designers of PNG thought the format should provide some extensibility, so we can continue. However for other formats that have no concept of metadata, embedding the Authenticode signature may not be possible. You can still used detached signatures at this point, but that’s for another time.
SIP Structure
A SIP is little more than a native DLL. There needs to be a way to register and un-register it, and it needs to implement the bare minimum of SIP functionality by exporting a few functions.
During registration phase, a SIP needs to declare what it can, and cannot do. There are at least five things the SIP must do. For our PNG SIP on GitHub, we implement the bare requirements, but I’ll continue to develop it and write new posts as I make more progress.
A SIP needs to perform these five things.
- It needs to identify if it is capable of handling a particular file.
- It needs to support digesting the file.
- It needs to support embedding the signature.
- It needs to support extracting the signature.
- It needs to support verifying the digest.
Once we can do those five things, we can round trip a signature.
I decided to write mine in C, but as long as your abide by the Win32 ABI and calling conventions, you can write a SIP in any language you would like. I am keen to try doing this in Rust myself.
Optionally, the registration functionality may or may not be part of the library itself. You could write an external program that knows how to register the SIP, or the library could implement
Dll(Un)RegisterServerand then useregsvr32to do the registration.It’s also worth pointing out that you will want a 32-bit and a 64-bit version of your SIP, and you will need to register it twice, once as 64-bit, and another as 32-bit.
The final aspect of SIP will be a unique GUID for it. This GUID should be the same for all platforms.
Before we can start writing code, we need to get a project in to a compilable state. You’ll need a variety of headers, but you’ll also want to make sure you link against the following libraries for our project:
- Crypt32.lib
- BCrypt.lib
- NCrypt.lib
The main feature headers are
Mssip.handwincrypt.h. Those two you may want to consider including in your pre-compiled header for this project.Registering
A SIP is registered with the function
CryptSIPAddProvider, which takes a single structure describing what your SIP can do, as well as its GUID.For my PNG library, I decided the simplest approach is to hard-code the path and register it with
DllRegisterServerto easily useregsvr32.Let’s pick a GUID first:
// {DA005D72-4E32-4D5E-94C5-41AECBA650FA}
DEFINE_GUID(GUID_PNG_SIP,
	0xda005d72, 0x4e32, 0x4d5e, 0x94, 0xc5,
	0x41, 0xae, 0xcb, 0xa6, 0x50, 0xfa);
You will want to generate a new GUID for your own project. You can use the “guidgen” program in the Windows SDK, it even has a display format that is friendly for
DEFINE_GUID.A very simple implementation of this might looks like this now:
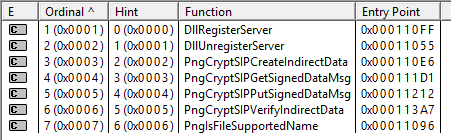
STDAPI DllRegisterServer()
{
	SIP_ADD_NEWPROVIDER provider = { 0 };
	GUID subjectGuid = GUID_PNG_SIP;
	provider.cbStruct = sizeof(SIP_ADD_NEWPROVIDER);
	provider.pgSubject = &subjectGuid;
#ifdef _WIN64
	provider.pwszDLLFileName = L"C:\\Windows\\System32\\pngsip.dll";
#else
	provider.pwszDLLFileName = L"C:\\Windows\\SysWOW64\\pngsip.dll";
#endif
	provider.pwszGetFuncName = L"PngCryptSIPGetSignedDataMsg";
	provider.pwszPutFuncName = L"PngCryptSIPPutSignedDataMsg";
	provider.pwszCreateFuncName = L"PngCryptSIPCreateIndirectData";
	provider.pwszVerifyFuncName = L"PngCryptSIPVerifyIndirectData";
	provider.pwszIsFunctionNameFmt2 = L"PngIsFileSupportedName";
	if (CryptSIPAddProvider(&provider))
	{
		return S_OK;
	}
	else
	{
		return HRESULT_FROM_WIN32(GetLastError());
	}
}
Lets go through this line by line of
DllRegisterServer. The first two lines create our struct and initializes it to zeros so everything is a clean “NULL”. There are a number of Win32 patterns here that should be familiar to Win32 developers. Particularly, setting the size of the struct as the first field. We then set our GUID, but we copy it locally first so we can take a pointer to it.pwszDLLFileNameaccepts the full path to the library. Note that this path must be how 64-bit Windows sees it. System32 is normally a directory that WOW64 does file system redirection. However, the path should be presented as if there is no file system redirection being performed. This can be meddlesome if you are trying to determine that current path of the library to dynamically determine it when WOW64 is in play from whatever is performing the registration.I instead just hard coded the path as I don’t really expect the SIP to be installed elsewhere. Note that this is a bit of a naive approach at the moment because it does not allow installation on a 32-bit Windows.
The rest of the fields on the struct are names of exports for the functionality of the SIP. Their names don’t matter, but I would make them unique and not collide with other function names in Win32.
The function definitions for these are loosely defined in
SIP_ADD_NEWPROVIDER, but we can stub them out for now and just doreturn FALSE. All together, our SIP should look something like this, so far:STDAPI DllRegisterServer() { SIP_ADD_NEWPROVIDER provider = { 0 }; GUID subjectGuid = GUID_PNG_SIP; provider.cbStruct = sizeof(SIP_ADD_NEWPROVIDER); provider.pgSubject = &subjectGuid; #ifdef _WIN64 provider.pwszDLLFileName = L"C:\\Windows\\System32\\pngsip.dll"; #else provider.pwszDLLFileName = L"C:\\Windows\\SysWOW64\\pngsip.dll"; #endif provider.pwszGetFuncName = L"PngCryptSIPGetSignedDataMsg"; provider.pwszPutFuncName = L"PngCryptSIPPutSignedDataMsg"; provider.pwszCreateFuncName = L"PngCryptSIPCreateIndirectData"; provider.pwszVerifyFuncName = L"PngCryptSIPVerifyIndirectData"; provider.pwszIsFunctionNameFmt2 = L"PngIsFileSupportedName"; if (CryptSIPAddProvider(&provider)) { return S_OK; } else { return HRESULT_FROM_WIN32(GetLastError()); } } BOOL WINAPI PngIsFileSupportedName(WCHAR *pwszFileName, GUID *pgSubject) { return FALSE; } BOOL WINAPI PngCryptSIPGetSignedDataMsg(SIP_SUBJECTINFO *pSubjectInfo, DWORD* pdwEncodingType, DWORD dwIndex, DWORD *pcbSignedDataMsg, BYTE *pbSignedDataMsg) { return FALSE; } BOOL WINAPI PngCryptSIPPutSignedDataMsg(SIP_SUBJECTINFO *pSubjectInfo, DWORD dwEncodingType, DWORD *pdwIndex, DWORD cbSignedDataMsg, BYTE *pbSignedDataMsg) { return FALSE; } BOOL WINAPI PngCryptSIPCreateIndirectData(SIP_SUBJECTINFO *pSubjectInfo, DWORD *pcbIndirectData, SIP_INDIRECT_DATA *pIndirectData) { return FALSE; } BOOL WINAPI PngCryptSIPVerifyIndirectData(SIP_SUBJECTINFO *pSubjectInfo, SIP_INDIRECT_DATA *pIndirectData) { return FALSE; }At this point we can verify we are making some progress. We should be able to compile this, put it in System32, and register it with
regsvr32. It’s a small step, but we should have a SIP registered that always fails. Now would be a good time to examine what registration is actually doing.At the heart of it, all the registration is doing is adding a few keys in the registry under
HKEY_LOCAL_MACHINE\SOFTWARE\Microsoft\Cryptography\OID\EncodingType 0Under that key are sub-keys for all of the possible things a SIP can do. We aren’t doing everything, and some of them remain entirely undocumented and to an extent, unused. However, for the five cores parts of a SIP we are supporting, we should see our SIP’s GUID under those registry keys. Namely,
- CryptSIPDllCreateIndirectData
- CryptSIPDllIsMyFileType2
- CryptSIPDllPutSignedDataMsg
- CryptSIPDllVerifyIndirectData
- CryptSIPDllGetSignedDataMsg
If we see our GUID under those keys, have a successfully registered SIP. You will see an identical pattern for 32-bit SIPs except under the
WOW6432Noderegistry key. You don’t have to register both a 32-bit and a 64-bit SIP during development. If you’d like, you can just as well develop a 64-bit only SIP. However, 32-bit uses of your SIP will not work, so you need to make sure you are testing with 64-bit tools, likesigntool.You’ll also want to make sure your library is exporting all of these functions correctly. Dependency Walker, ancient as it is, does this well. You’ll want to not only make sure they are exported, but also are unmangled.
File Support
There are two ways a SIP can decide if a file format is supported. It can do so by just the name of the file, or it can do so by actually examining the contents of the file. For performance, I would recommend implementing just the file name check. You can still bail out of the actual signing process with an error if you determine that you can’t actually sign the file. In our bare-bones implementation above, we exported the function
PngIsFileSupportedNameand put that in our registration. We need to export a function with that name and return a Win32 BOOL indicating if it is supported.A simple approach is to just check the extension of the file by creating a substring and using
_wcsicmp. An implementation might look something like this:const WCHAR* ext = L".png"; size_t len = wcslen(pwszFileName); if (len < wcslen(ext)) { return FALSE; } size_t offset = len - wcslen(ext); assert(offset >= 0); const WCHAR* substring = &pwszFileName[offset]; int result = _wcsicmp(substring, ext); if (result == 0) { *pgSubject = GUID_PNG_SIP; return TRUE; } return FALSE;The name of the file that you are given is wide characters, so make sure you use the appropriate functions. You must also specify the GUID of the SIP as an out parameter for
pgSubject. In our case we use our own SIP, however you can use this if you have multiple SIPs - you can actually have just one library that determines which SIP GUID to use, or delegate the work to another SIP.If this returns
TRUE, it moves on to the actual process of creating a digest.Create Indirect Data
The actual structure in the PKCS#7 signature is a structure called indirect data. Among the things in here is the digest of the file. Our next step is we need to create a digest of the file in a function with a signature like this:
BOOL WINAPI PngCryptSIPCreateIndirectData(
	SIP_SUBJECTINFO *pSubjectInfo,
	DWORD *pcbIndirectData,
	SIP_INDIRECT_DATA *pIndirectData
	)
This function will actually be called twice, the first time with
pIndirectDataas NULL, and the second with an address. This pattern may be familiar to Win32 developers. The first call it is expecting you to set thepcbIndirectDataparameter with the size of the amount of memory needed forpIndirectData. Internally, the Authenticode system will then allocate the amount of memory you told it to, then call the function again with the address of the memory inpIndirectData. During the second call, it’s up to you to set this as a pointer to aSIP_INDIRECT_DATAstructure.For the first call, it isn’t as simple as just using
sizeof(SIP_INDIRECT_DATA)and going with that.SIP_INDIRECT_DATAhas a field calledDigest, which is another struct. This is itself aCRYPT_HASH_BLOB, which has two fields. The first isDWORD cbData, and the second isBYTE *pbData.This
pbDatais a pointer to the hash that we need to create. Problem is, a pointer to what? Who owns the memory? We cannot stack allocate it because we need to return it from a function. We can allocate it on the heap, but the SIP doesn’t have a cleanup phase, or a way to tell us “I’m done with that memory”.Instead what we need to do is set
pcbIndirectDatato enough memory for everything that we need to return. The authenticode system owns this memory, and will free it when its done with it. We need to make sure this still points to aSIP_INDIRECT_DATAstructure, but we can put anything past that. To make this easier and avoid pointer acrobatics, I defined a new structure that looks like this:#define MAX_HASH_SIZE 64 #define MAX_OID_SIZE 128 typedef struct INTERNAL_SIP_INDIRECT_DATA_ { SIP_INDIRECT_DATA indirectData; BYTE digest[MAX_HASH_SIZE]; CHAR oid[MAX_OID_SIZE]; } INTERNAL_SIP_INDIRECT_DATA;It starts with a
SIP_INDIRECT_DATAstructure so it still looks like one. After that, I make two more fields. The first is adigestfield, which will create 64BYTEs after theindirectDatafor us to place our hash. There is no hash algorithm that produces a digest bigger than 64 bytes currently, so 64 seems sufficient. After that we have aCHARarray in the struct which will contain the OID of the hash algorithm. I used a generate 128CHARs for this, even though most commonly the longest it can be us 22 CHARs.We can then set the
pbDatathat introduced this problem to the address of thedigestfield in our new structure. We will do the same with the OID.Roughly, that gives us something like this (all validation is omitted here for brevity - be careful!):
BOOL WINAPI PngCryptSIPCreateIndirectData(
	SIP_SUBJECTINFO *pSubjectInfo,
	DWORD *pcbIndirectData,
	SIP_INDIRECT_DATA *pIndirectData
	) {
	if (NULL == pIndirectData) {
		*pcbIndirectData = sizeof(INTERNAL_SIP_INDIRECT_DATA);
		return TRUE;
	}
	//TODO: validations
	INTERNAL_SIP_INDIRECT_DATA* pInternalIndirectData = (INTERNAL_SIP_INDIRECT_DATA*)pIndirectData;
	memset(pInternalIndirectData, 0, sizeof(INTERNAL_SIP_INDIRECT_DATA));
	DWORD digestSize;
	MagicGetOurHash(&digestSize, &pInternalIndirectData->digest[0]);
	pInternalIndirectData->indirectData.Digest.cbData = digestSize;
	pInternalIndirectData->indirectData.Digest.pbData = &pInternalIndirectData->digest[0];
	//TODO: set all other members of the struct including the OID.
	*pIndirectData = pInternalIndirectData;
	return TRUE;
}
For a real implementation of this member, see the GitHub project. This pattern allows us to forgo worrying about the memory cleanup. When authenticode is done with the memory, it frees the whole block that we asked it to allocate.
When
CryptSIPCreateIndirectDatais called for the second time, Authenticode expects that, at a minimum, thepIndirectData’sDigestmember is correctly filled out. That includes the digest itself, and the OID of the algorithm.pSubjectInfogives us the information we need to compute the digest. It itself includes aDigestAlgorithmstructure indicating what digest algorithm it’s asking for. This includes the OID of the algorithm.To translate the OID in to a more useful type which allows you to get a CSP or CNG algorithm identifier, you can use
CryptFindOIDInfo:PCCRYPT_OID_INFO info = CryptFindOIDInfo( CRYPT_OID_INFO_OID_KEY, pSubjectInfo->DigestAlgorithm.pszObjId, //validation omitted here CRYPT_HASH_ALG_OID_GROUP_ID);One trick with this call us you need to set
CRYPT_OID_INFO_HAS_EXTRA_FIELDSbefore<windows.h>is included. For me that meant putting it in a pre-compiled header nearWIN32_LEAN_AND_MEAN. Setting this define puts members on thePCCRYPT_OID_INFOstruct that are helpful for use with CNG, likepwszCNGAlgid, which can be used withBCryptOpenAlgorithmProvider.Finally, the
pSubjectInfo->hFileparameter will give a handle to the file that is being signed.It’s worth discussing some best practices at this point about how to digest a file.
Don’t over-interpret the file
Let’s use a PE file as an example here. Part of the PE file that is digest is the
.textsection, or program code. The digesting process does not care what-so-ever about the program code itself. For example, aNOPassembly instruction doesn’t alter the behavior of the program directly, so one could argue that the signing process should attempt to read the x86 assembly and skip over NOP instructions.But of course that isn’t done. It isn’t the signing process’s job to understand x86, and the theoretical example above could be used in an attack.
The PE signing does skip some parts of the PE beyond the signature itself, such as skipping the checksum, because the checksum has to be updated after the signature has been applied.
Conversely, some canonicalization might be expected. For example, the way a PE’s sections are arranged in the executable do not matter. The signing process sorts the sections (.text, .rdata, etc) so that the order of the sections do not matter.
Don’t execute input
Another part to make clear is the signing process shouldn’t use the signing input as executable code. That would leave the file being signed in control of how it is being signed, and could likely convince a SIP to do something unexpected.
Include as much as possible
My recommendation here is to sign everything except the signature itself. The PE format makes an exception for the checksum, which cannot be included, but otherwise, that’s it. The PE format used to support omitting the signing of embedded debug information, but that is no longer that case.
You might be tempted to skip over benign contents of the file. For example, with PNG we might be tempted to skip embedded metadata that aren’t part of the actual image itself. I would argue that all data is relevant, and omitting metadata attached to the image is harmful to the signing process.
Be wary of the file size
Canonicalization and being smart about the file format might make reading the whole file in to memory tempting. However, keep in mind what some file sizes might be. You may want to open a memory-mapped view of the file if you cannot read it in a stream.
Put Indirect Data
We can calculate a digest of the file now, but now we need to be help Authenticode understand how to embed the signature in the file.
The final thing we need to actually sign a file is to implement
CryptSIPPutSignedDataMsg. This function is pretty straight-forward. Given aSIP_SUBJECTINFOwith a handle to the file being signed, embed thepbSignedDataMsgparameter whose length iscbSignedDataMsg.As mentioned earlier, we cannot just write this data at the end of the file, otherwise it will corrupt the file. We need to embed it in such a way that the file will continue to function.
For PNG, this is actually a straight forward process. It is composed of chunks, and each chunk has a 4 character identifier. The case of the identifiers letters indicate a few certain flags. This lead me to create a new chunk type called
dsIG, which indicates that the chunk is not critical and that it shouldn’t be copied. When we digest the PNG file above when we’re creating the indirect data, we skip overdsIGchunks.The exact details of this are in the GitHub project. I may write another post later about the specifics of PNG files if there is enough interest. However, I would take a look at the specification first if you’re interested. The format is very easy to understand.
At this point, we can sign a file, and
signtoolshould report successfully signing the file type. Theverifystep will fail though because we have not implementedCryptSIPGetSignedDataMsgandCryptSIPVerifyIndirectData.I’ll save those two for Part 2, though they are available on GitHub right now.
Update: Part 2 is available.
-
OpenVsixSignTool
I recently started a little tool called OpenVsixSignTool, which is an open source implementation of signing a VSIX package. If that sounds boring to you, I agree! It has a niche audience, considering that Microsoft already makes a tool for signing VSIX packages, which are extensions for Visual Studio. Why an OSS version of it?
The idea came from Claire Novotny, so kudos to her for wanting to make signing VSIX packages better. Claire encountered some limitations of the existing sign tool, and implementing a new one from scratch wasn’t an entirely crazy idea.
The limitation came down to where the existing VsixSignTool was willing to look for a certificate and private key to sign with. The Microsoft VsixSignTool requires PFX file with the public and private key to sign, or a certificate in a P7B file with the certificate and private key in the certificate store.
Ideally, it could do a few new things. The first is have the same behavior as the Authenticode
signtoolwhere it takes a simple SHA1 thumbprint of the certificate to sign with and finds it in the certificate store. No more P7B file. The second is an entirely new idea, which is to use Azure Key Vault. Azure Key Vault supports certificates and keeping the private key in an HSM, which OpenVisxSignTool does support.It’s still being built, but the rough functionality is there. If signing VSIX packages is something you want to do, give it a try and let me know how it can be better.
-
Custom Keys with Authenticode Signing
The only official way to Authenticode sign a file on Windows is using the very flexible “signtool” as part of the Windows SDK. Signtool is capable of signing a variety of things, such as portable executables, MSIs, etc with a variety of different digest algorithms, timestamps, and the like.
One area of signtool that has not been flexible is where it looks for the private key to perform the signature. If the private key was not associated to a certificate in the certificate store, signtool would be unable to use this.
This meant that the private key needed support from CAPI or CNG. If the private key was not reachable through a CSP or CNG Store Provider, then sign tool would not be able to use the key. For the most part, this was OK. Most SmartCard and HSM vendors provide a CSP and/or CNG Provider, so signtool worked fine.
Sometimes though, a CNG or CSP provider is not available. A practical case for this is Azure Key Vault. In this situation, using signtool was not possible, until recently.
Starting in the Windows 10 SDK, two new command line switches are available,
dganddi. Recall that a signature is always performed on a hash on Authenticode. Thedgoption changes signtool’s behavior to output a digest that you can sign using anything you’d like. Let’s try this on a copy of notepad.exe.signtool sign /dg "C:\scratch\dir" /fd SHA256 /f public-cert.cer notepad.exeThis takes a file to a public certificate - there is no key in public-cert.cer. You could also use the
/sha1option to specify a certificate in the certificate store that also has only a public key. This will output a few files in the “C:\scratch\dir” directory. The digest is the one with the “.dig” extension. This file will have the Base64 encoded digest to sign. Next, using your custom tool, sign the digest with the private key for the certificate. You should decode the Base64 signature before signing if the signing API expects a raw binary digest.Next, encode your signature in base64 and place it in a file in the “C:\scratch\dir” directory with the same name as the digest file, with the “signed” extension. For example, “notepad.exe.dig.signed”.
The next step is to ingest the signed digest along with the rest of the Authenticode signature to complete the signing.
signtool sign /di "C:\scratch\dir" notepad.exeThis will complete the signing process, and we now have our own signed copy of notepad.exe. Appending a signature is done just as before, except with the
/asflag.This provides great flexibility for signers to use non CSP / CNG signing options, or offloading the signing process. Signtool can now also sign just a plain digest file using the
/dsoption. If you have a dedicated server for performing Authenticode signing, you can now use the/dg,/ds,/dioptions so that only a very small file needs to be moved to the signing server, instead of the entirely binary if they are large in size. -
Yubikey 4C Review
Incase you weren’t aware, Yubico launched a USB-C version of their popular Yubikey device. On launch day, the 13th, I paid for 3 of them and eagerly awaited their arrival.
I’ve recently just finished up a laptop refresh at the house, which means “MacBook <something>”. For light use and travel, I have a MacBook with its singular USB-C port. For heavier things, I have a MacBook Pro with Thunderbolt 3, which gives me 4 USB-C ports. I have no laptops with USB-A connections anymore.
If you have all or mostly USB-C in your life, then the 4C is a great companion and works just as well in its previous form.
Comparing
The 4C can go on a key ring, just like the 4 could. Their sizes are noticeably different though. The 4C is smaller in width and height, at the expense of it being thicker.
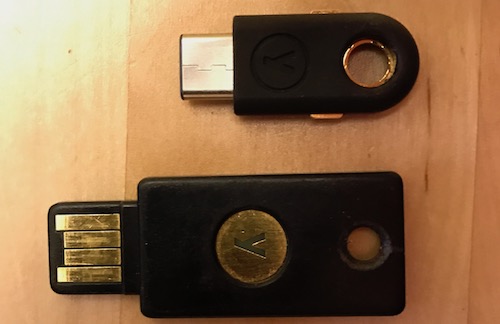

I find the thickness just slightly troublesome when it’s attached to a key ring. The previous one left just enough space for the key ring to jut out from. With the additional thickness, I now have to prop my laptop up, put it on a stand, or find a new solution for the key ring. However the smaller size is a welcome change since it’s permanently affixed to my key chain.
Functionality
It’s identical to the original 4. It’s worth noting however that you can’t clone one Yubikey to another, so you may have to use both for a while during a transition phase. This includes the actual Yubico OTP functionality, and any additional configuration you have have loaded in to the second slot, PIV certificates, etc. I opted to re-key my PIV certificate and replace it.
I did have a lot of trouble with the Yubikey Personalization Tool. On one Mac it works fine, on another it does not. On Windows it always seems to work. This wasn’t unique to the Yubikey 4C, either.
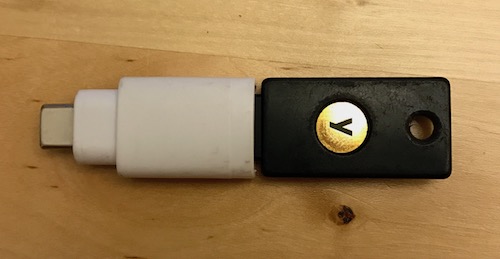
USB-C
If you are in a pure USB-C environment, or mostly so, then this is a great upgrade. No little adapters to lose. If however you have a mix of USB-C and USB-A, you might want to stick with USB-A for a while. There are plenty of adapters that allow you go to from USB-A to USB-C, but the reverse doesn’t exist, and that’s intentional. Since USB-C can do power delivery, plugging a USB-C device in to a USB-A port might damage the USB-A port, so the USB-IF does not allow such things to get certified.
-
The Pains of Deploying HTTPS Certificates
There’s been some discussion recently about how long an x509 certificate should be valid for if they were issued by a Certificate Authority that is a member of the CA/B Forum.
Currently, the limit is 39 months, or three and a quarter years. This means that operationally, a certificate from a CA must be changed at least every 39 months. The discussion proposed shortening that length to 13 months.
Why Shorten It?
While Let’s Encrypt is lauded for being free, the most impressive aspect of it is that it can be - and is easy - to fully automate. Let’s Encrypt makes CertBot, a piece of software you install on your server that sets up HTTPS for various web servers, and handles renewals, domain validation, etc. Since this is fully automated, the validity period of a certificate is inconsequential - the certificate could be valid for a single day as long as it keeps getting renewed and replaced correctly.
This has a lot of positives. A short lifespan of a certificate means revocation is less of a concern. Revocation in PKI largely doesn’t work in HTTPS simply because that in most* cases, online revocation checking isn’t performed. We have tools coming soon that will help fix that like Must Staple, but those are still a ways off from being widely deployed and adopted. If a certificate is only valid for three months and is mis-issued - this limits the period of time that a mis-issued certificate could be used.
Along with Must Staple and CT, this also helps address the issue of domain squatters buying a domain, getting a long-length certificate for it, and then selling the domain all the while having a valid certificate.
There’s also plenty of good reasons aside from these to shorten a certificate’s length.
Why Not Shorten It?
Shorter certificate lifetimes have several benefits, so what are the reasons not to allow such a thing? We have a proven system to demonstrate that it’s automatable, and for more complex cases, it should be relatively painless to automate, right?
That’s where I have to disagree, and why I’m rather hesitant to support this with the current state of certificate deployment.
I’d like to tell a short story about a certificate I had to manage. It was for an HTTPS endpoint that a 3rd party used to upload data to us. The 3rd party required our endpoint to support HTTPS, and strangely while doing this integration they asked us to securely deliver the x509 certificate to them. When asked why, they said they pin to the certificate that we send them. They required pinning the leaf certificate. This means when we have to change our certificate, we need to coordinate with the 3rd party.
Unfortunately, this 3rd party wasn’t exactly fast to perform these changes. We needed to coordinate days in advance with them, discuss the operations, and they actually counted the hours of work against our support contract.
If this sounds ridiculous - I agree. But, it was the requirement. The 3rd party insisted on doing it - and talking with others they were frustrated by the same requirements. The certificate still needed to be issued by a CA - that is they would not pin against a self-signed certificate, etc. Also, this party had a monopoly on the data we wanted, so we didn’t have much choice there, either.
This is one example of many that I can recount in an environment where renewing a certificate is not easy - or possible - to automate. Other situations involved an overly-complex CCRB where changing the certificate required a lot of operational testing, sign off, approvals, etc. Process can be fixed, but it’s more stubborn than some might realize. Other challenges are technology, like when an HSM is involved. Yes, it’s automatable - but it will take a lot of time for an organization to get there, and HSMs are unforgiving with mistakes.
It’s also worth pointing out that I think a lot of people lose sight of the fact that certificates are used (often!) outside of HTTPS. TLS is a general purpose transport tunnel. You can encrypt all sorts of traffic with it - such as Remote Desktop, SQL Server, VPN, CAPWAP, etc. Some of these circumstances do require or use a certificate from a CA. While a web server might be easy to automate, other things are not.
This would lead to a tripling of certificate replacement work.
Quick Thoughts
I’m not happy with the status quo, either. Certificates should be automatable, they should have a shorter lifespan - but we’re not quite there yet. I would argue that it would take some organizations months, or years of work to support automating their entire infrastructure. Yes, I think it would be a big benefit for organizations to have that anyway.
Going from 39 months to 13 months is over ambitious at this point. I would test the waters of this with a change to 25 months to see how CA’s customers are able to cope with the change. That will also put the writing on the wall that they need to start automation before the 13 month limit is imposed.
It’s hard to balance good security with what works in the real world. I just don’t think the real world is ready at this point for this change. Organizations are already scrambling to keep up with other changes. The TLS 1.2 requirement for PCI vendors already have them working hard.
I do hope we get there one day though.
* “Most” is used generally here - revocation checking behavior differs from environment to environment and the type of certificate, such as EV certificates.